FINISHED! Abbey Pool Hero Vest

Sometimes things just fall together and this is one such make. Spoiler alert: I love this make and it is currently my hot tip for my make of the year. But.. there are 4 months to go so I best hold my betting til closer to the end when all the finalists are in. It has been a long time since I have been so excited by a make - I was desperate to sew a bit everyday until this was finished.
Let's start at the beginning. One of my favourite makes of this year was Jo's vest which has been sitting in my subconscious since she posted it. I adore it.  Oh that fur collar and pre quilted fabric. It is super cool.  The second thing was that I saw a dress recently made by Christine out of Liberty of London Abbey Pool and I was reminded that I had failed to buy this fabric, and that it was currently available online from Tessuti. So I quickly remedied my missing Liberty. Lastly, Toni from Make it Perfect released the Hero Vest for Women. She quickly thereafter released additional instructions to the pattern to provide for a hidden zipper. Boom. I knew right then that I was going to quilt the Abbey Pool for a vest. I had bought the fabric for a dress, but as soon as it arrived it's new destiny was confirmed.
A quick note about the fabric. It is Liberty of London Abbey Pool and is from the Spring Summer 2013 The Flower Show collection.
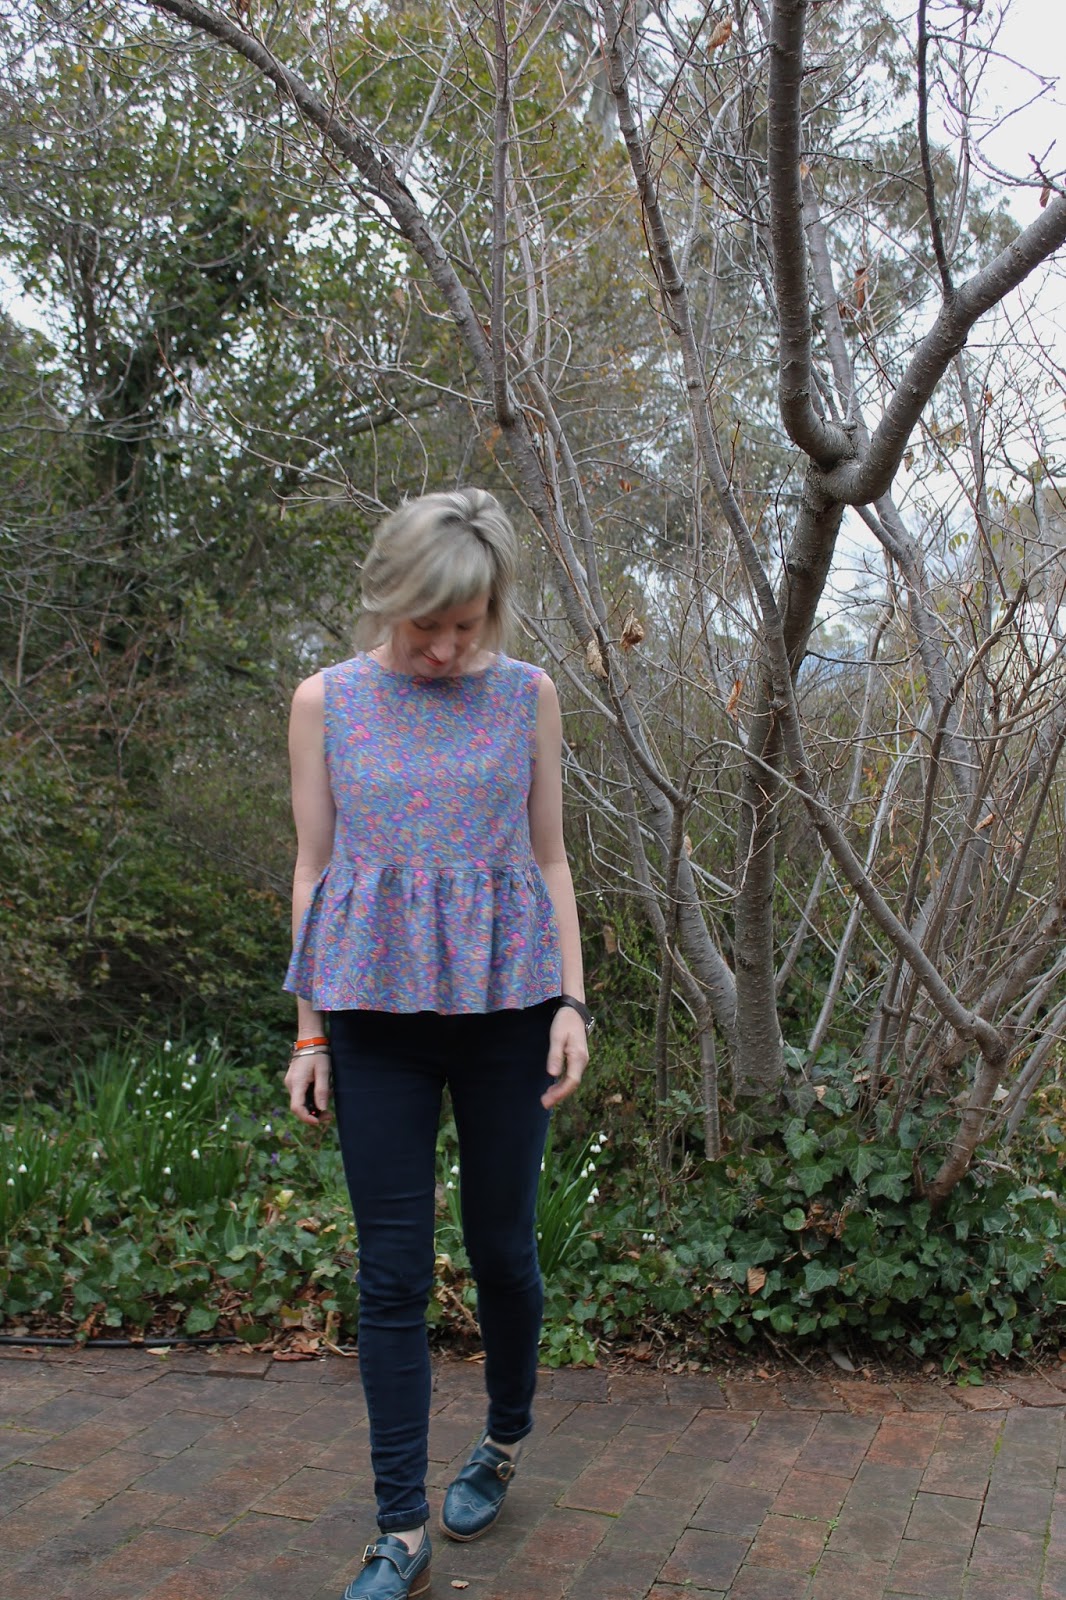
The Botanical Garden capsule collection was been digitally printed and features designs by eminent artists Mary Fedden, Hugo Grenville and Rachel Pedder Smith which sit alongside artworks by the Liberty Art Fabrics studio and freelance designers.  Abbey Pool is by Mary Fedden OBE, a Royal Academician and has had many exhibitions and commissions. Mary was the first woman to teach painting at the Royal College of Art, where one of her students was David Hockney. Mary Fedden’s art concentrates on the pre-occupation of the still life with a view beyond.
  
Back to the vest. The sewing of this wasn't too hard except for maybe the zip, but we'll get to that. I self quilted the fabric which was rather therapeutic (though I won't be doing this again in a hurry!). I roughly cut out each pattern piece - with about an extra inch added and then quilted simple lines 1 inch apart. Once I had everything quilted I cut out the patterns according to the pieces. This is a XS and I did panic at one point that I should have made a bigger size but I'm ok with the fit.  I took about 2cms off the length of it. The whole thing including the hood is lined in a navy cotton.
I added an inside pocket piece to make it neater inside as I didn't want the batting to be visible from the inside. All the versions of this pattern that I've seen have contrast ribbing for the pockets, arms and hood. I used simple self made binding rather than ribbing as I was after a simpler look and I'm really happy with how they turned out. For the hood and arms I hand stitched the binding down because I'm not super confident machine stitching the binding down and I wanted those parts - that are visible - to be as neat as possible.

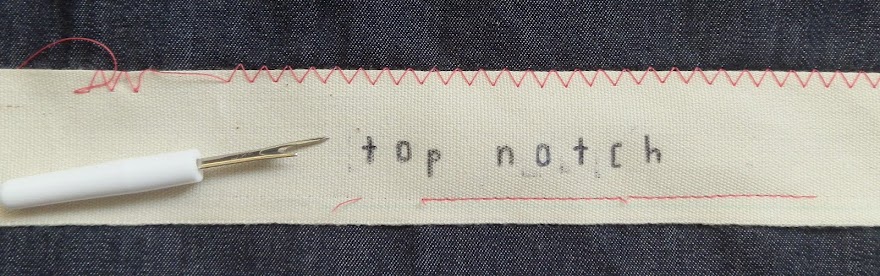
Ok the zip.  I was so happy when Toni released some additional instructions to make this zipper hidden. The pattern comes with instructions for just having the zip seams exposed on the inside and so I was planning on working out myself how to hide the zip, so happy I didn't have to do that.  I worked really hard to try and match up every quilted line on the zip. I used chalk to mark the lines on the zipper which worked pretty well. If you look really close - please don't - there are a few little places that aren't perfect, but I unpicked so many times to try and get it lined up that I ended up with this as my best and final. I'm pretty happy and proud of my effort with it and I won't wear it zipped up much so I'm not going to worry about it anymore.  I didn't top stitch the zipper down as I was worried that this might get a bit messy.

Not much more to say about this except WOOHOO! It is the perfect vest moving into spring and of course goes perfectly paired with my neutral (stripes) and I can't help but feel a bit proud of myself with this one. 

FINISHED! Viyella Peplum

A quick post today to showcase a little top I made out of some gorgeous gifted fabric.
Earlier this year, Jen generously gifted me this lovely piece of Viyella fabric. It has a lovely almost flannel hand, with a strong diagonal weave.  The photo above is the real colour of the fabric, sadly the other photos have the fabric looking a bit washed out. 
It was a tiny piece of fabric only about 1m by 90cm. Just enough to make a little sleeveless top. I would have just had enough for small sleeves but I stupidly tapered them in which meant that if I'd attached them I wouldn't have got my arms in.. so sleeveless it was.  
The style of top will come as no surprise. A little peplum. It is a hack of the kanerva with a gathered peplum. I can't help myself. I love a little gathered peplum and they just feel me.  This one is a bit shorter than my usual ones but I like it and have plans to pair it with my denim pants for the spring. 
I'm not much of a sleeveless girl, so this top is perfectly paired with a cardigan and I have surprised myself by how often I reach for this outfit.
Thanks again Jen for so generously gifting me this beautiful fabric x

FINISHED! Denim Xerea dress

This last weekend I was supposed to go to Frocktails in Melbourne but given my son was sick (he is much better now) I cancelled at the last minute and found myself at home and itching to sew for the first time in ages.  I decided to start the new Xerea dress by Pauline Alice. I bought some light coloured denim from Addicted to Fabric (the last of the roll) and before I knew it, I'd finished it and if I could I would have worn it everyday since!
I love wearing patterns, but I adore almost as much, a simple denim dress. An attempt to channel some understated Alexa Chung cool perhaps. You may remember that I made a denim dress last year using the sigma pattern but while I love it to look at, I just haven't worn it. There is just too much bulk in the top back, made worse by the weight of the denim. Given that denim dress is destined for the charity bag I felt justified in making another one for my wardrobe. 
I made view A, lengthening the sleeves to 3/4.  I just prefer a longer sleeve and makes this seasonally perfect. Originally the sleeves were longer but after taking some photos on Sunday realised that they were just a bit long so took another inch or so off.   I intend to wear this to work (which I did on Monday!) so I didn't make it too short so that it would still be reasonably decent with higher shoes or when the spring comes and I'm not wearing stockings.
The suggested fabric is light to medium weight, so the denim does hang a bit heavy. You can see this in the photos where there are extra shadows. But I don't mind it and in real life I think it's fine. I did iron this before the photos but there is something about this fabric that like to crease and there are two  deep horizontal creases in the fabric which I will need to work harder to get rid of. 
This is a hugely satisfying make. It's oh so quick! The fabric was bought and washed at lunch and it was made by 6pm.  It helped of course that I didn't have to make any adjustments.  My favourite part is the binding on the neckline- sewing it on before closing the back up. I'm not a big fan of putting binding on, so gosh this just makes it so much easier to do! It also helps that the back pieces are straight!
The other great thing about this pattern is the small v at the back, which means it's a high neck (something I also love) but you can just slip on with no closures. I made a small mistake with attaching the back -  I couldn't get the the pieces to make a point. Accidental design feature! The V also adds a nice bit of interest to the back.
Oh and of course the pockets. The lines are great, which you can't really see from the photos but go back and check out the line drawing. And they are easy to put together (there is also an additional photo tute on Pauline's website).

I'm a huge fan of this dress - and fully expect to make up more!

Check out more cool Xereas: Inna and Sonja  and Lindsay have also made super versions